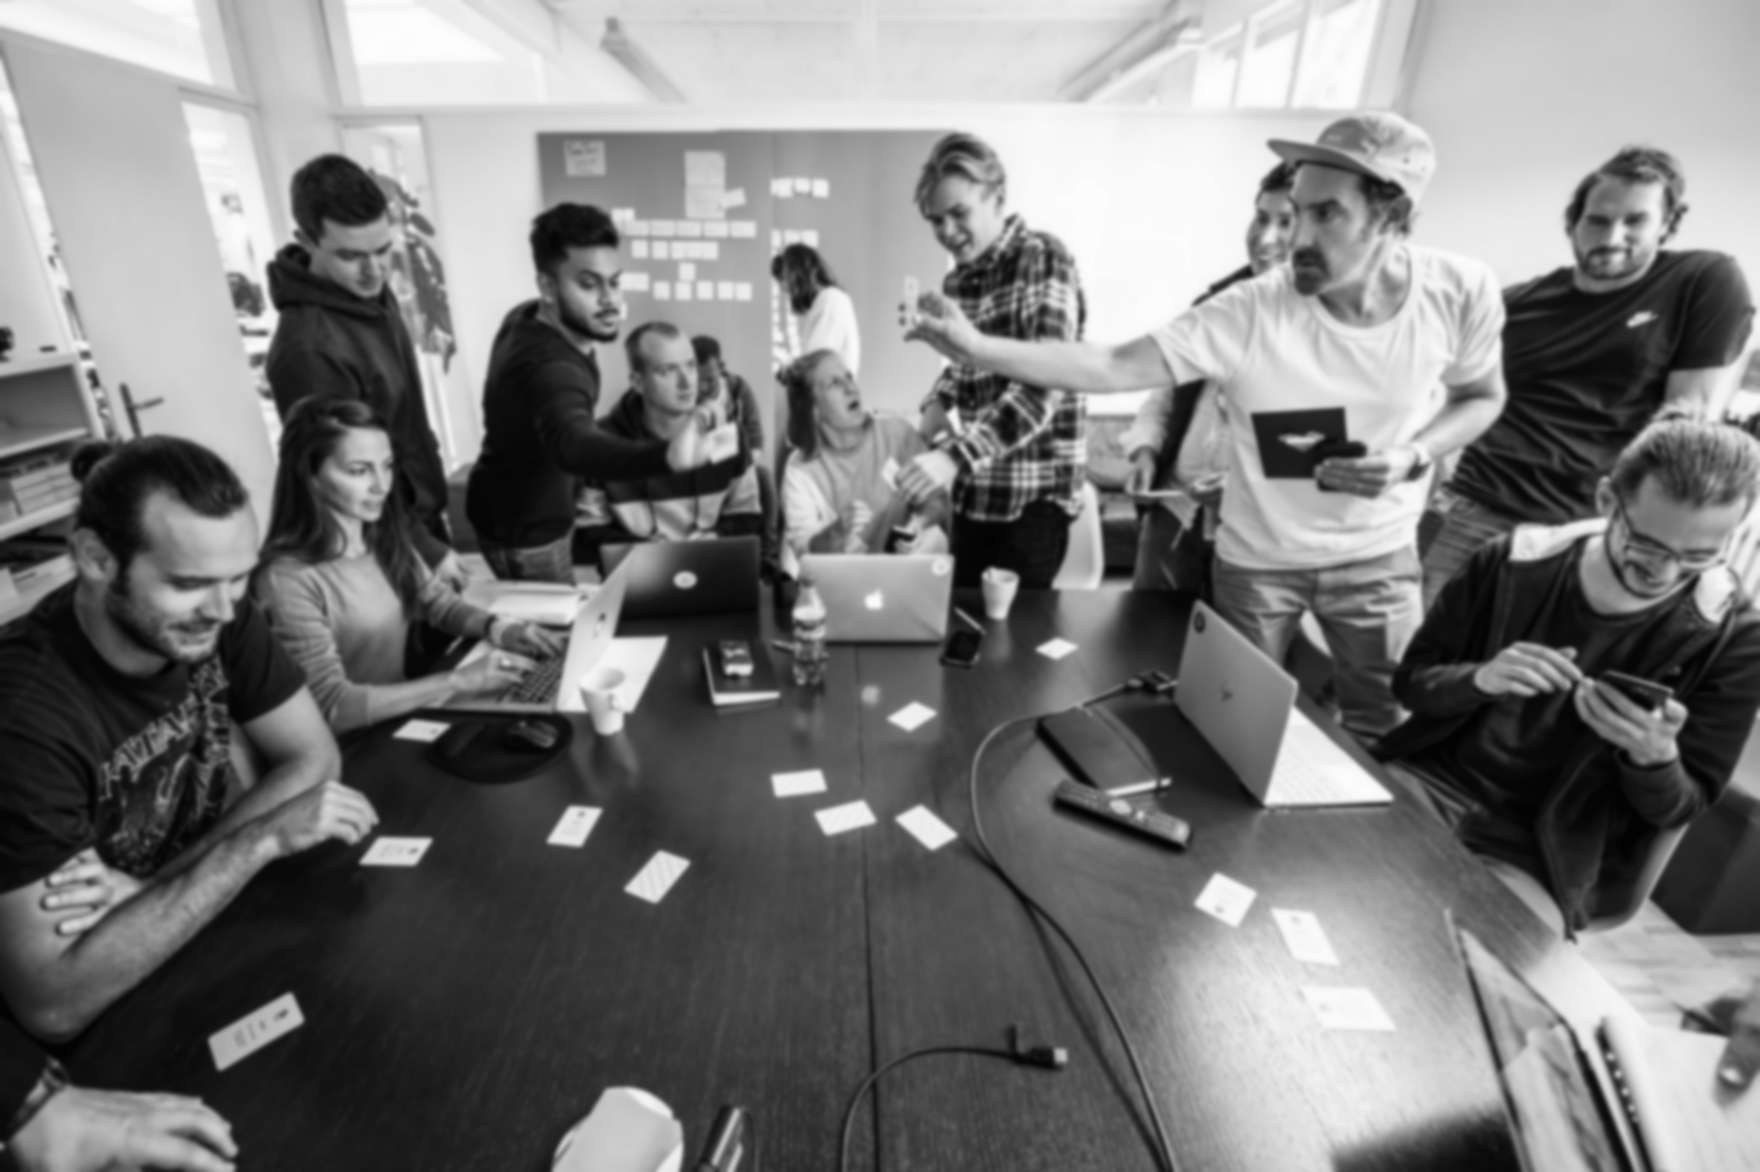

In this blog post, we would like to show you how to get from an idea to a realized product, what phases and steps are necessary and what challenges arise. To make the whole thing a little clearer, Nick Gerber from our Concept & Design team will guide you step by step through the development of an internal product.
🔮 How it all began
As part of my final thesis for my Interaction Design degree, I had the opportunity to conceptualise and design a project from research to the creation of a functional prototype. As a project, I wanted to realize a tool that provides a real benefit and can actually be used.
📱 The range of devices from Apps with love
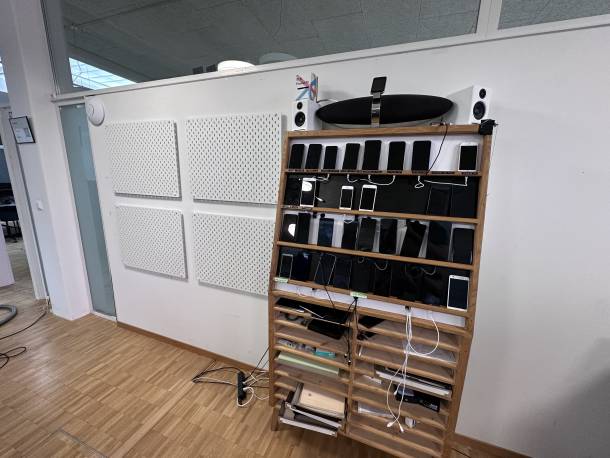
To test apps and websites, Apps with love maintains a pool of smartphones and tablets from various manufacturers with different screen sizes, operating systems and versions. This fleet of devices is housed in a piece of furniture we call the 'device wall'.
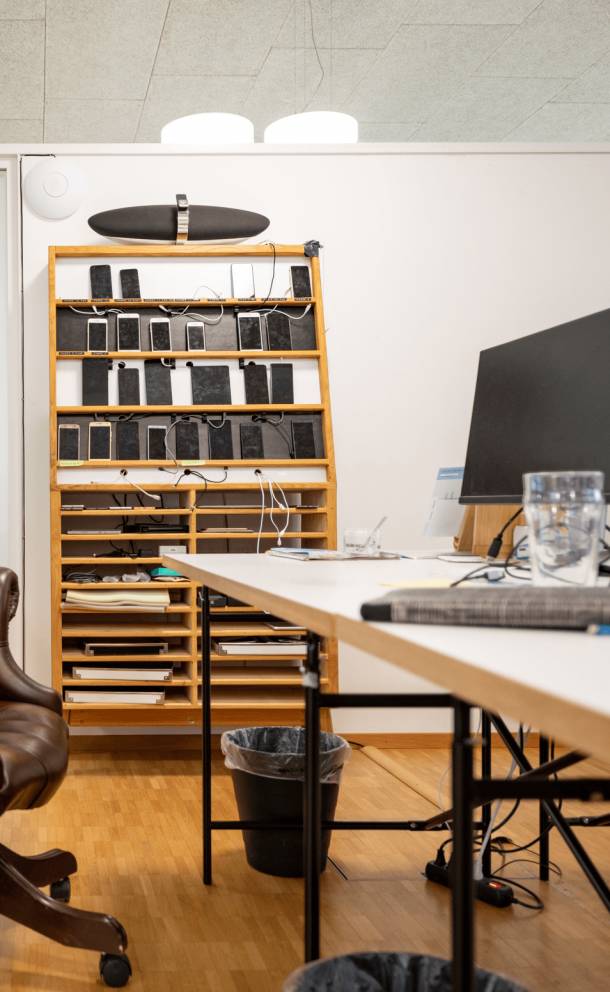
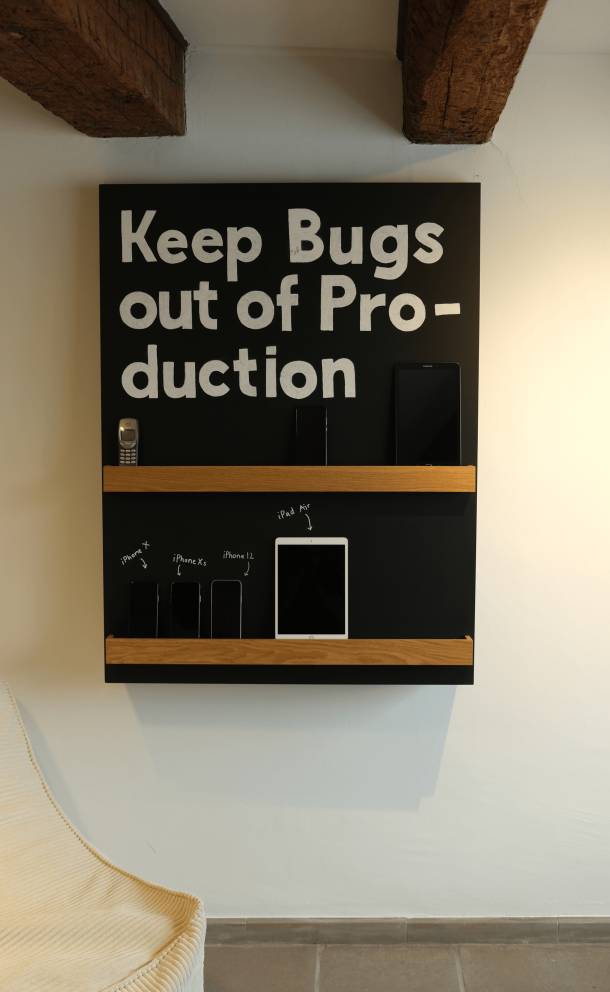
The device walls in our offices in Bern and Basel
😡 Problems with the device wall
The company and its range of devices have grown considerably in recent years. Apps with love now has over 100 devices. This has created new challenges in the daily use of the test devices, for which there were previously no satisfactory solutions.
From observations in everyday life and discussions with the Head of Quality Management, Martin Mattli, the following challenges emerged that needed to be overcome:
🌀 Test devices are scattered around the office and can no longer find their way back to the wall
⏱️ The search for the right devices is time-consuming because it isn't clear where they're located
🙅♂️ The current lending process isn't known to all employees and isn't consistently practiced
🪫 Test devices that are on the wall, are often not charged
ℹ️ Technical device specifications are difficult to access
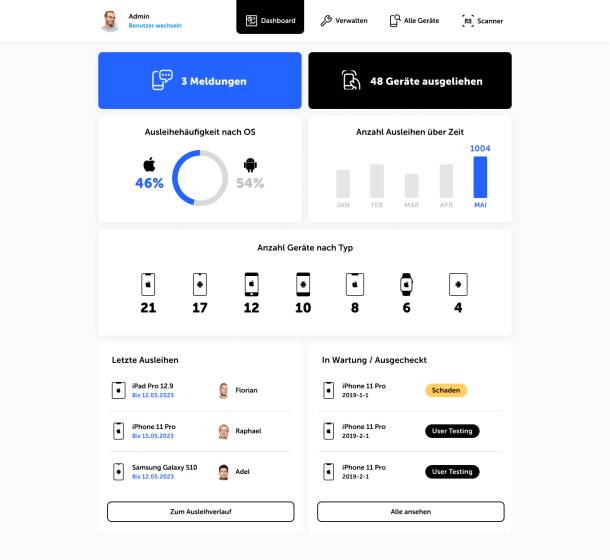
🔭 There's no overview of the device fleet
🤬 Dealing with the device fleet leads to frustration. with the equipment pool leads to frustration
📍The equipment pool can only be experienced on site in the offices in Bern and Basel
🛠️ The maintenance of the equipment is time-consuming
The steps in the product development process are described below. From research to concept, design, prototyping and realization. What was done, how and why?
Research
At the start of the project, I wanted to gain a deeper understanding of the needs, challenges and the initial situation. After all, a suitable solution can only be developed if the problem is truly understood. To this end, I divided the research phase into two parts.
🎙️ Interviews with users of the device wall
The challenges and pain points described above were further explored at the beginning of the project with the help of qualitative interviews with the users of the device wall and the understanding of the core problems was sharpened.
🔍 Analyze existing processes and tools
I analyzed the existing process and the tools used in more detail to understand what's already working well and where there's still potential for a new solution.
💡Knowledge from the research
Through the research phase, I was able to gain a deeper understanding of how the current solution is used and where the real problems and possible solutions lie in dealing with the test devices. The following findings emerged:
😵💫 The phases "Search & Finding the device", "Borrowing" and "Returning" present the greatest difficulties and problems for users
🤔 Users must always be able to find out where or with whom a device is currently located
ℹ️ A central source of information about the test devices is required, that all users can easily access
🤸♂️ Users want to be able to borrow devices flexibly and spontaneously
😇 The borrowing process must be as simple as possible so that users stick to it
🤵🏻♂️ "The local butler": Many users would like to be able to carry out the lending process directly on the device wall
🔍 The new system should show transparently who has just borrowed which device. This leads to more order and a greater sense of responsibility
💬 Established structures such as MDM tools and the existing Slack channel #testdevices should continue to be used and sensibly linked to the new solution
🔙 The test devices must always be returned to the wall after use
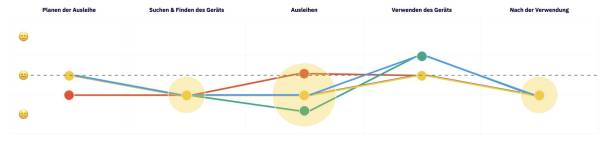
Evaluation of interviews Process phases
✍️ Concept and solution ideas
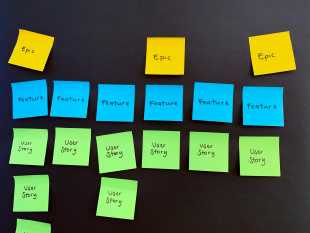
🙋POV statements
I recorded the needs, problems and wishes that were identified during the research in the form of point-of-view statements (POV). To get a better overview, I've organized them into thematic blocks. A POV statement describes a problem or a need from the perspective of a specific persona.
🤔 How Might We?
The findings from the research phase led to questions in the form of "how-might-we-questions" (HMW). These help to put a problem into a suitable form in order to formulate a solution. As a rule, a statement about a need in the form of a POV statement is taken as the starting point for an HMW question - a description of the problem from the perspective of a specific persona. This form is similar to a user story. Here is an example:
POV statement
As a user of the device wall, I would like to be able to report problems and damage to a test device so that someone can take care of it.
HMW question
How can we enable the user of the device wall to report problems and damage to a test device so that someone can take care of it?
Solution ideas arise from the answers to these HMW questions. They're, so to speak, the answer to the underlying need or problem. I then summarized the resulting solution ideas in coherent thematic blocks:
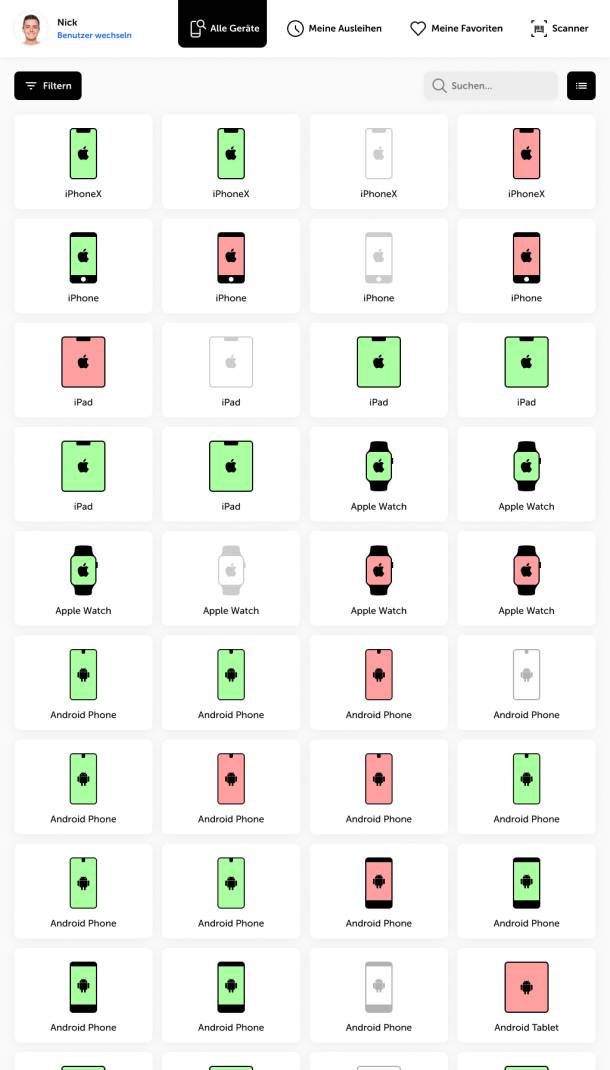
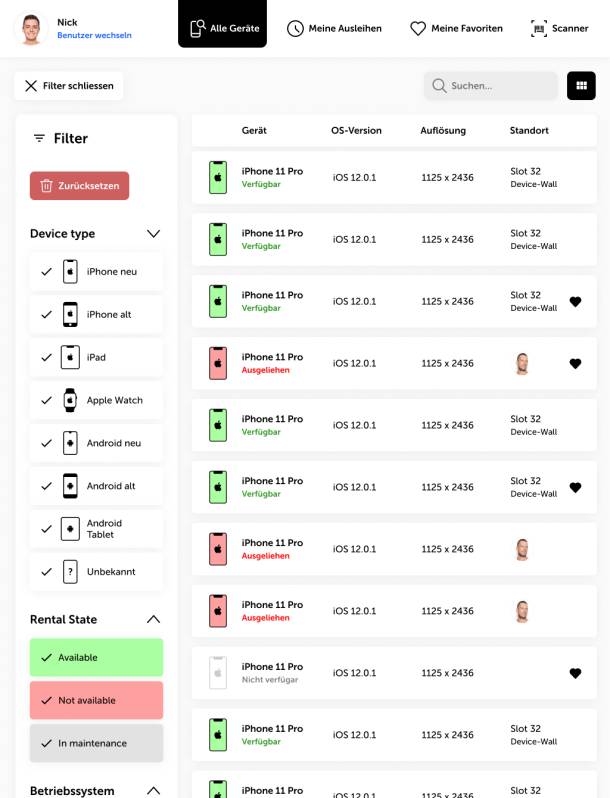
Create an overview
🔭 By listing the devices, we create an overview in the device jungle
🖱 We offer a reduced presentation to make orientation easier
🔖 The devices are clearly divided into categories
Loan status
🚦 The loan status of each device is clearly visible
📅 Equipment deployment can be planned using the reservation function
📅 Availability calendar to optimize planning
Information on the devices
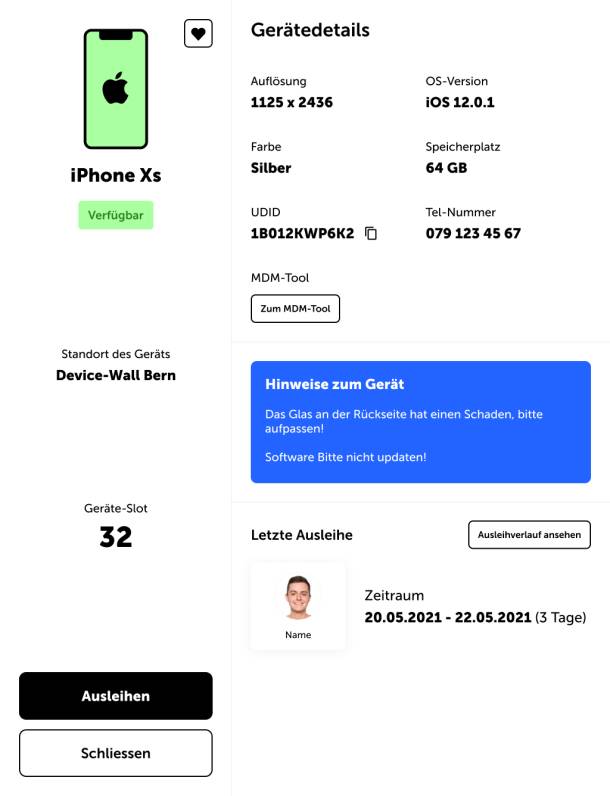
ℹ Easily retrievable information in the detailed view
📲 More information and options thanks to the connection of MDM tools
From need to device
🕵 Filter options to quickly find the right device
📄 Find frequently used devices quickly thanks to the loan history per user
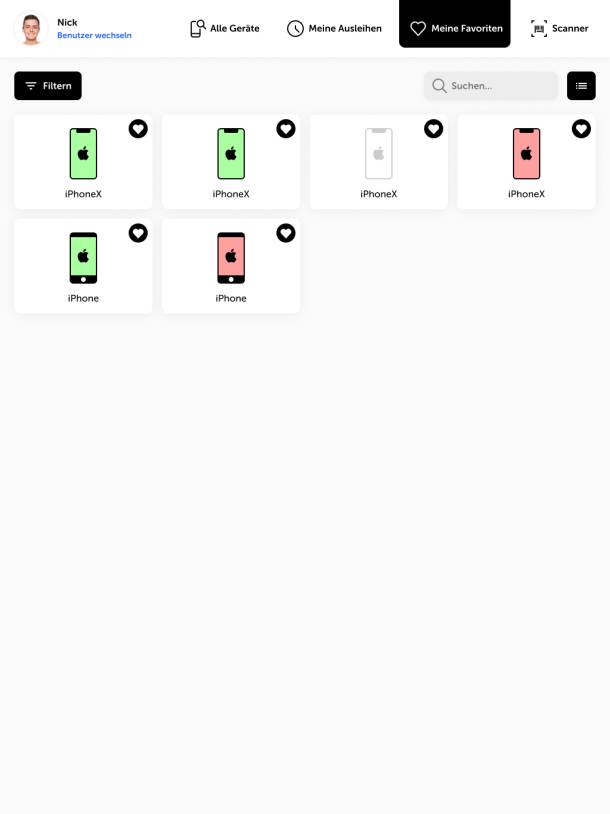
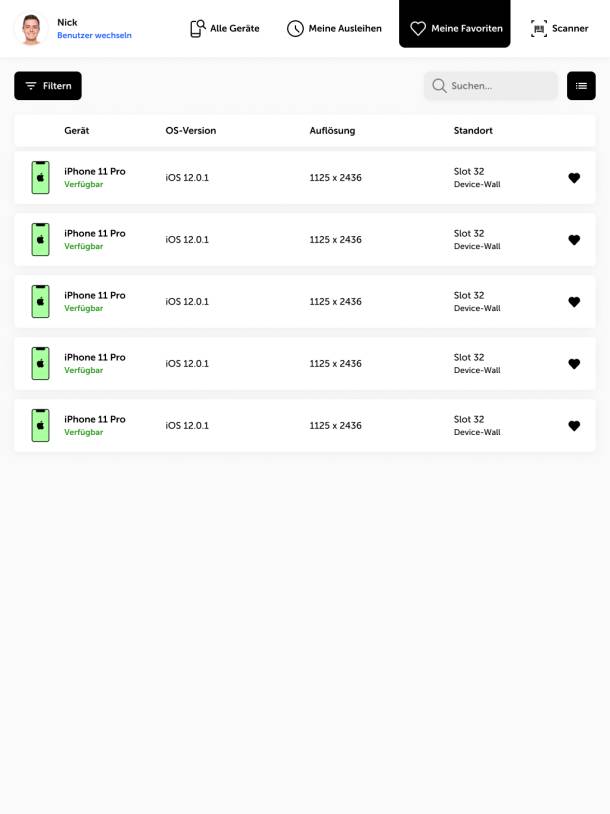
💟 Favorite devices can be found quickly thanks to the favorites function
Find devices
🔢 Unique slot numbering on the wall
🚨 Light up the device with a push message on the desired phone
🙋 Each device has a borrower or location stored
💬 Slack connection for easier communication
Convenient lending of devices
✅ Borrow from a terminal on site
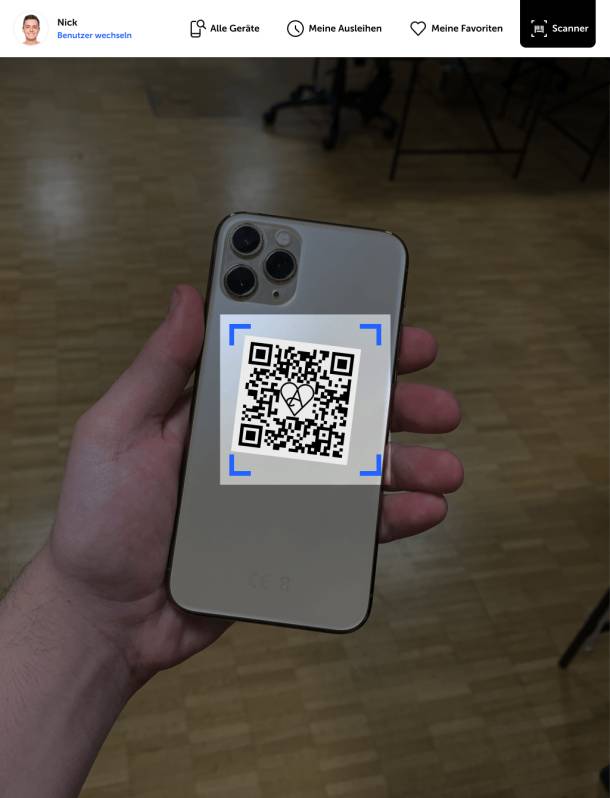
🤳 Use the scanner to quickly find the desired device
🏎 The borrowing process consists of just a few steps with as few mandatory details as possible
📅 The reservation calendar enables effective planning
🤖 We offer automation options
thanks to the intelligent device wall
Instructions and notifications for smooth borrowing
⚠ Slack as a channel for notifications
🔔 Reminder function supports users in the process
🔔 Reminder function for forgotten checkout of a device
💬 If damage or problems are noticed when a device is returned, these can be reported
⚠💬 Notes on a device can be recorded
Important data during use
ℹ Important information in detailed view
🔑 Accounts and passwords
Datentransfer
🚀 Use of Updraft (our own app distribution tool)
👥 Shared account on all test devices
Communication channel
💬 Reporting function for damage and problems with devices
💬 Slack integration for easier communication
Return devices
🔔 Reminder function for returns
🔌 Note to connect devices
🤳 Fast checkout via device scanner
📄 Own loan history for users
🤖 Intelligent device wall
Analysis of usage and device data
📄 Loan history for each device
💬 Messages for devices in a summarized overview
These are the possible solution ideas that have emerged from answering the HMW questions. They're the building blocks that will now be put together in the next steps to create a coherent overall experience. In order to create this coherent overall experience, these ideas will be further concretized and brought into context.
User journeys and information architecture
🌈 User Journeys
The individual feature ideas that emerged during the concept phase are now being structured and brought together into a coherent experience. To do this, I defined user journeys that encompass and depict the most important tasks that users have with the application. User journeys help to organize the individual functions and content in a meaningful sequence that ensures the most efficient and user-friendly process:
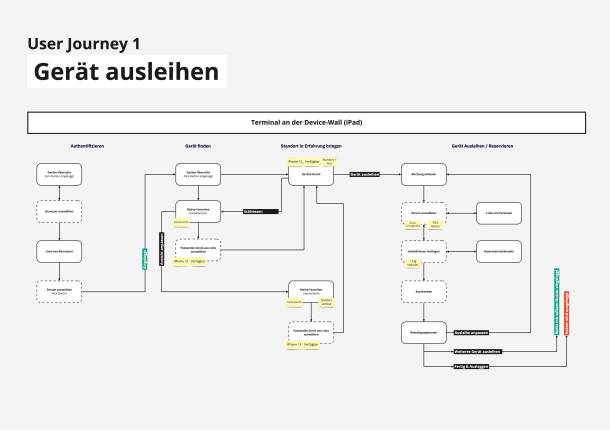
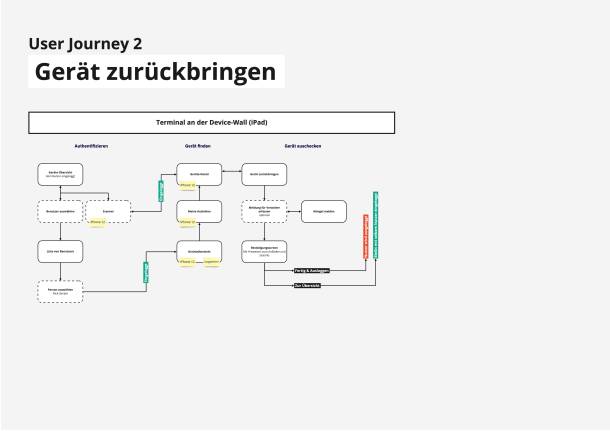
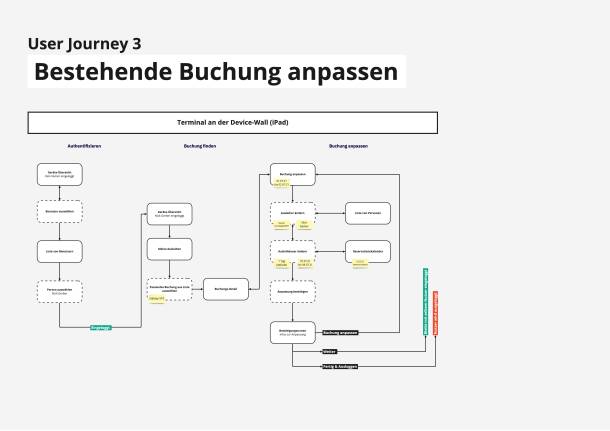
The user journeys of the most important tasks
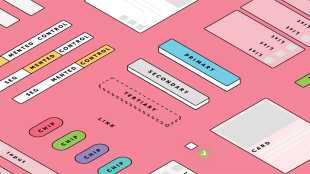
🏠 Information architecture
To get an overview of the entire system with its functions and content, I created an information architecture. This helps to understand how the individual content and features of the application are linked to each other and which paths users can take. A clear information architecture and a precise user flow are essential to enable a positive user experience. By carefully designing these aspects, users can achieve their goals effectively and efficiently and enjoy using the application. In addition, the information architecture helps the project team to maintain an overview and the connections between the individual areas of the application.
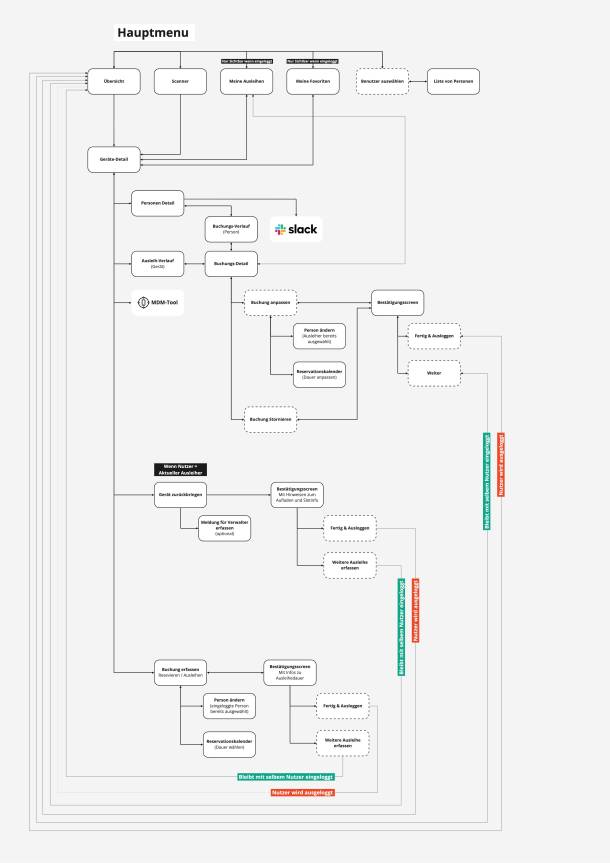
Information architecture of the device wall
🎨 Design
I then designed the individual screens and features based on the user journeys and information architecture. I based the design on the Apps with love corporate design.
Based on the answers from the qualitative interviews with users, I also made sure that users could quickly get an overview of the devices, find the devices they wanted quickly and use the available functions intuitively. To ensure this, the tool was kept as minimalist as possible and functions were placed at the centre.
🚦Color communicates status
In the design, colors are used specifically to communicate status information. The rest of the user interface has been toned down in terms of color and mostly kept in black, white and greyscale so that the important information is shown to its best advantage. This should help users to quickly grasp the information relevant to them.
👁️ Clarity through separated areas
The user interface is organized into clear containers that help users to find their way around. Furthermore, the individual blocks of information are grouped thematically and clearly separated from each other visually.
ℹ Dosed information
Information is presented in the user interface in a measured way so that users can orientate themselves well. Care is taken to show only the information that's relevant to the respective process step. This is to prevent users from being overwhelmed by too much information at the same time.
📱Device mockups instead of real images
To make the devices easier to recognize, device mock-ups are used to represent the device types on the device wall. The illustrations make it easier to recognize the devices and improve the consistency of the user interface. In addition, the device illustrations can be used as a surface to communicate the availability status of the device via color.
🤏 Optimization for different device sizes
It was important to me that the UI could be used equally well on desktops and mobile devices. Interactive elements are therefore generously sized so that they're easy to use. The user interface also adapts to the size of the end device.

Impressions from the design of the digital device wall
🏗️ Realization
✅ Good starting position thanks to thesis
After weeks of working on my thesis, I finally had the final document in my hands. But the project was far from over. My goal was to put the theoretical concept into practice and create a functioning application. I presented the project internally and was given the green light to start implementation. Fortunately, my thesis had already given me a solid basis for realizing the project. All that was missing was the implementation with code so that a functioning product could be created that could be used.
🎩 Small team, many hats
At the beginning of 2022, in addition to my work as a designer, I started an internal web developer internship with a workload of 20% to consolidate and expand my expertise in frontend development. During the internship, I had the opportunity to realize the visual frontend of the device wall. To implement functional components such as the connection to the database, I received support from one of our web developers.
Parallel to the development of the project, I also took on the role of product owner. As the original creator of the concept, I had the best overview of the project and a clear idea of how it should look and function. To ensure that the project was structured, I wrote user stories and specifications and made decisions together with the team about which components of the device wall should be implemented and how. The development process was kept very lean and we were able to react agilely to new findings. Thanks to my role as Product Owner, I was able to make timely and flexible decisions to ensure that the project met our requirements.
💡Knowledge
I found it a very valuable experience to be able to accompany a project from the initial idea through to realization and to help with every step. Normally, as a designer, I'm mainly involved in the initial phase of a project and other people from the project team then take on tasks such as project management, requirements engineering or development. The hands-on experience in this project allowed me to gain a different perspective on the creation of a product and I now understand the challenges of the other roles much better.
This helped me to realize how important clear communication is at the interfaces between the teams and process steps. I also realized that there's a huge advantage when team members have interdisciplinary knowledge in other disciplines. In this way, they can anticipate the challenges ahead and solve or simplify potential difficulties in advance, leading to a higher quality solution and avoiding unnecessary detours and hurdles.
In practice, this means building a solid architecture from the start and using tools such as design systems to create a structure that greatly facilitates communication about the product's components and functions between the various disciplines. Regular and early exchanges are also an important part of making collaboration more efficient.
🔭 Outlook
🧪 Introduction and test phase
The first version of the Device Wall application is currently being introduced at our company and replaces the old lending process. In a test phase, we would like to collect further requests and ideas in order to gradually expand the application in a meaningful way.
🤖 The new physical device wall
At the same time, we're in the process of reorganizing the physical device wall. We're focussing on DIY and designing our own holders for the devices. We print these directly using our own 3D printer in the office. There are also lots of creative ideas for how we can integrate lights, sensors and other technical refinements into the wall. We can already give you a small insight into the "construction work" - stay tuned!
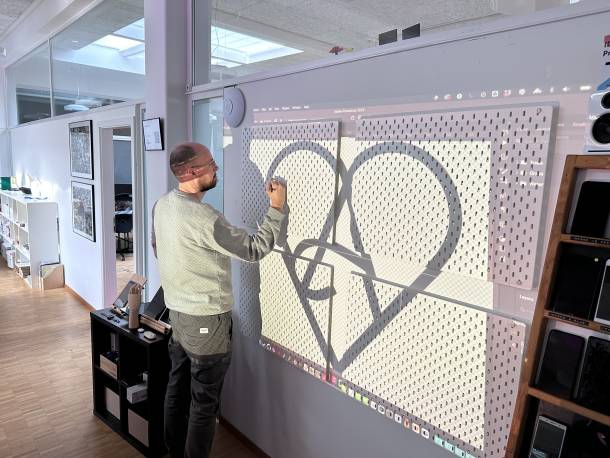
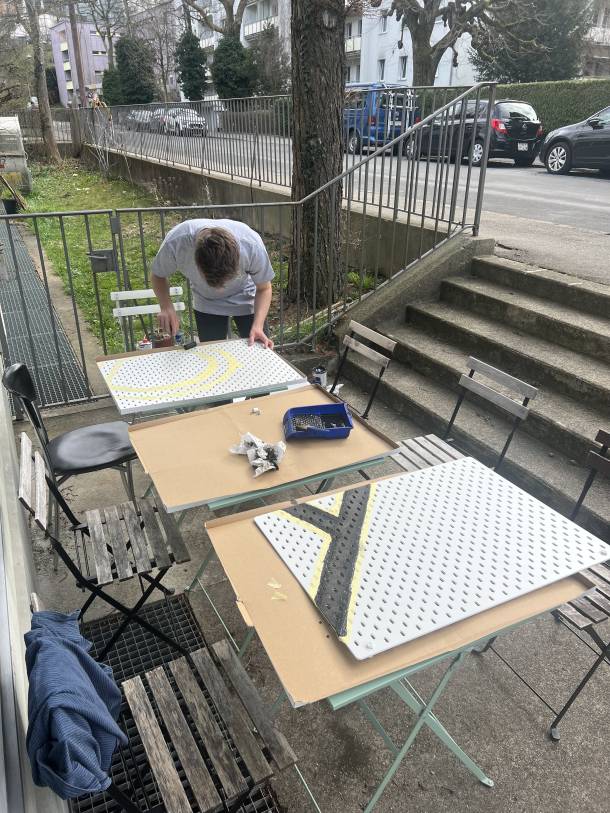
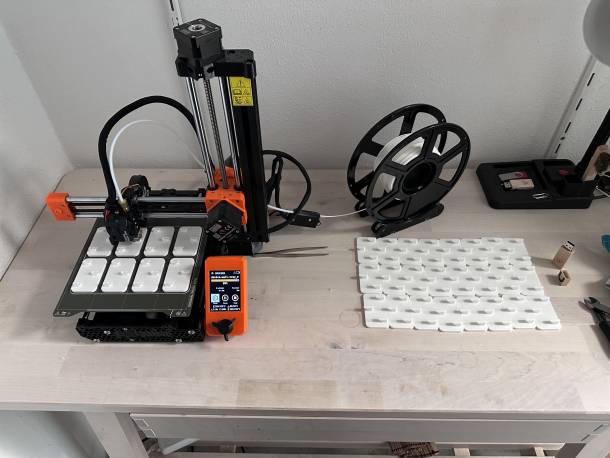
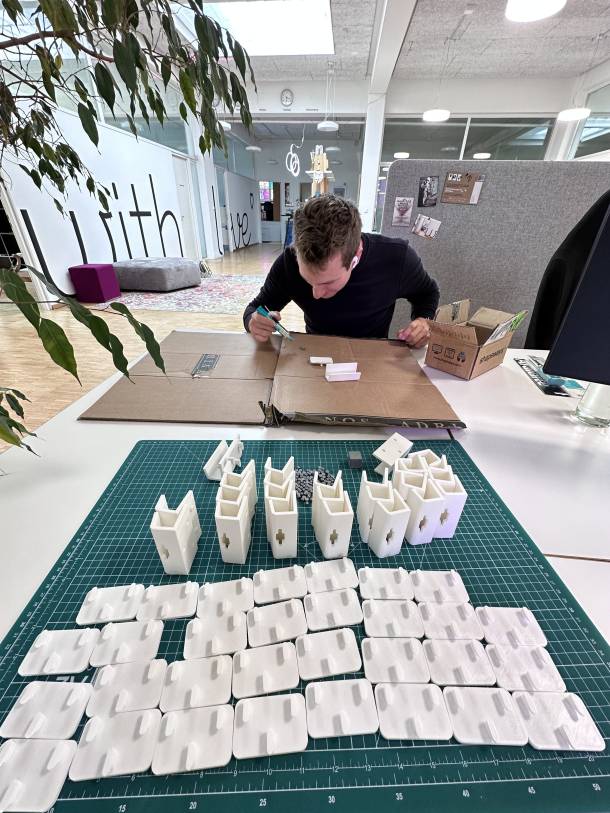
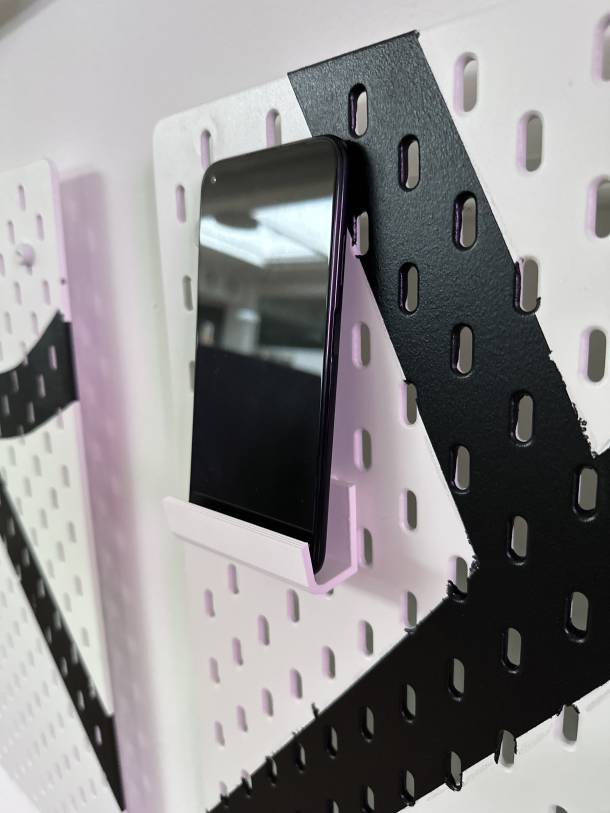
Creation of the new physical device wall in the Bern office
🎁 White label product
During the project, we realized that many of the solutions and feature ideas we found could also be interesting for other use cases. With minor adjustments, it would be possible to realize other lending services, such as for tools or company vehicles. We're currently examining where such a solution could be useful and are also investigating internally which processes we could simplify as a result.
😉 Have we piqued your interest?
This blog post is about an exemplary procedure for the realization of a rather small product. Depending on the project plan, scope, organization and complexity, it may make sense to deviate from this procedure or to organize it differently or add to it.
Are you interested in the story behind this product? Do you have an idea that you would like to realize and perhaps already have some initial ideas or even more? No matter where you're right now, we would be happy to work with you to find out what the right approach is to make your project a success. Get in touch with us!